Inventory Management By Mouser
Getting Started
The Inventory Management app will be deactivated on 15th May 2025. On this date, access to your Inventory Management account will be disabled.
To ensure you retain your data, we recommend exporting it as soon as possible.
About Inventory Management
The Inventory Management by Mouser platform is a web-based system for organisations to easily manage and track their on-premise stock of electronic components and related supplies.
Popular features include:
- Online easy-to-use dashboard
- Quick, step-by-step setup wizard
- Manage and track part numbers and inventory levels
- Generate current and historical inventory reports
- Import current product inventory data from spreadsheets
- Link products in your inventory to Mouser part numbers for easy reordering
Log in with your My Mouser Account to get started at http://inventory.mouser.com.
Login and Setup
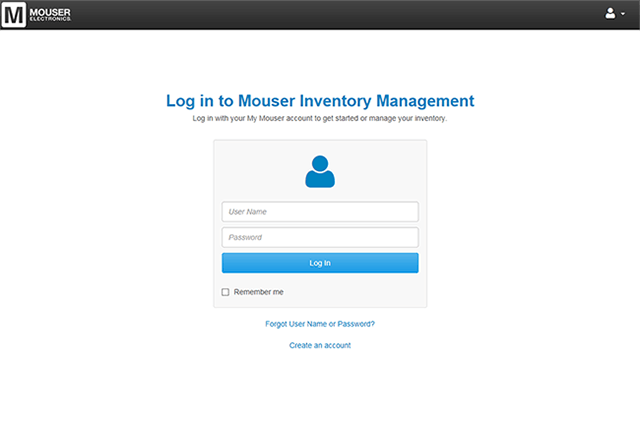
You can log in to the Inventory Management system by accessing http://inventory.mouser.com from any web browser on a desktop computer or mobile device.
Users must use their My Mouser user name and password to log in to the system. To retrieve a lost or forgotten password, users can request for it to be sent to them via email by filling out the forgotten password form.
After successfully logging in, new users are taken to the Setup Wizard area where they are asked to provide the necessary details to set up their inventory account. Existing users are taken to their inventory dashboard.
If you are a new user and your My Mouser account is not associated with an existing Inventory Management account, you will be taken into the new user setup wizard.
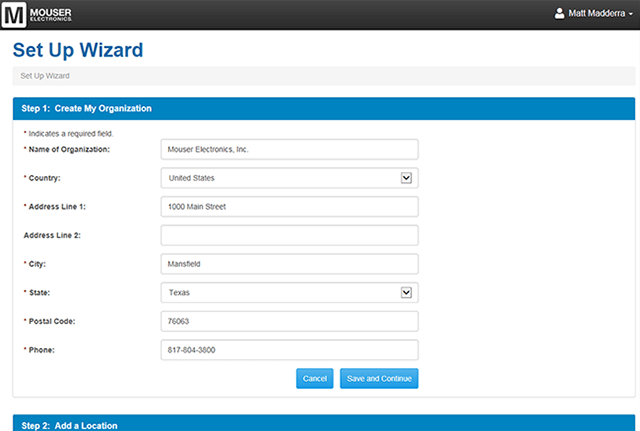
- Step 1: Create My Organisation - Complete the form to give us basic information about your organisation. If this information is already stored in your My Mouser account, it will be automatically filled out for you.
- Step 2: Add a Location - Once we know who your organisation is, you need to create at least one location in which to house inventory products. It is recommended that a location be set up for each physical place where you store inventory (e.g. "Lab 1" or "Equipment Closet" or "Room 121"), however if you have a large organisation you may prefer to create locations for entire departments/subdivisions (e.g "EE Department"). Once all desired locations are set up, click the "Finish Setup Process" button to proceed to the final step.
- Step 3: Setup Confirmation - Once your organisation and location(s) are set up, you will see a welcome page which will provide some options to quickly get started using the Inventory Management Application (e.g. "Manage Products", "Go To Dashboard" and "Manage Users").
If you are an existing Inventory Management user and have multiple locations configured within your organisation, you will need to select the location you wish to manage. Once you make a selection from the provided list, you will be taken to the dashboard home page for that location. If you only have one location configured, you will bypass the location selection step and go directly to the dashboard home page.
Getting Around
There are four menus located in the top navigation bar of Inventory Management:
- Location Selector - This will display the name of the inventory location you are currently managing. All the inventory information displayed is based on the location selected in this menu. When clicked, all locations you have access to will appear. Clicking on a location name in the menu will switch your active location.
- Basket - This icon will display the number of lines in your inventory reorder basket. When you click the icon a quick view of the cart's contents will display. mini-cart overlay to display on the screen with the current contents of the cart. From the quick view display, you can click the "See All Items" link to be taken to the basket reorder screen.
- Application Options - Clicking the icon will display a list of configuration options for your Organisation, Locations, Users, Consumers and Vendors. Clicking an item in the menu will direct you to the appropriate settings page.
- User Settings - Clicking this icon will display a list of user-specific options.
Four items are located in the left navigation bar:
- Dashboard - Clicking this icon will direct you to the dashboard home page.
- Products - Clicking this icon will direct you to the inventory product listing.
- Transactions - Clicking this icon will direct you to a listing of the inventory check-in/checkout records.
- Reports - Clicking this icon will direct you to the inventory reporting tool.
Dashboard
The Inventory Management dashboard is the central home page for all inventory data and actions supported within the application. When viewing the dashboard for a given location, you will see five prominent "Quick Links" to common functions or sub functions within the inventory application. The dashboard also contains special "At A Glance" and "Inventory Alerts" sections (see below for more information).
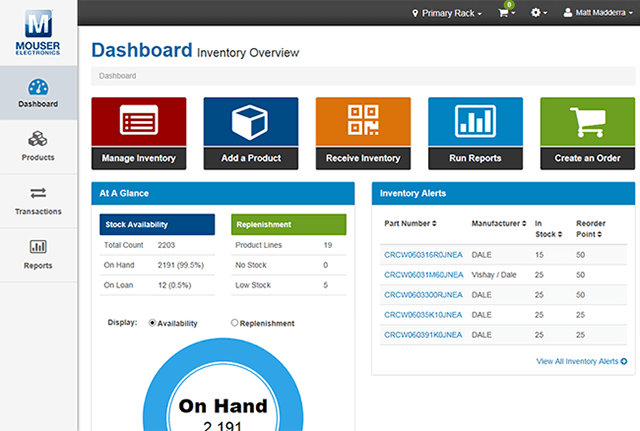
These shortcuts provide one-click access to the most common areas and actions within the inventory application - Manage Inventory, Add a Product, Receive Inventory, Run Reports, Create an Order.
At A GlanceThis section of the dashboard provides a quick tabular and graphical representation of your current inventory data.
Inventory AlertsThis section of the dashboard provides reminders related to your inventory's stock levels.
Managing Products

- Active - When visiting the products page, this view will be displayed by default. This view displays parts that are active in your inventory and that you can interact with.
- View All - This view shows all products, regardless of availability or status.
- Available to Loan - This view option will restrict the product listing to just those parts specifically designated with "The product can be loaned".
- Inactive - This view option will restrict the product listing to just those parts marked as inactive.
When using the search box on the right of the screen, the products grid will be updated to show the matching results.
Product LabelsIn order to make it easy to use the inventory companion mobile app, you can print barcoded product labels for the items in your inventory. Putting these labels on the bin or container housing a product will make it easy to use a mobile device with a camera to scan labels and avoid manual product searches. There are two label printing options located under the "More" menu:
- Print All Labels - Clicking the "Print All Labels" option will generate print-ready labels for all active products.
- Print Selected Labels - Clicking the "Print Selected Labels" option will generate print-ready labels for those products selected (checked) on the products screen.
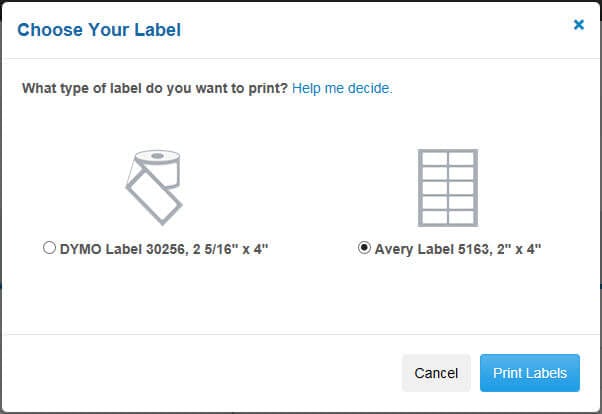
When printing labels, you will have the option to select your label paper format. Currently, two format options are available:
- DYMO Label 30256
- Designed to be printed by a DYMO single-label printer
- We recommend DYMO LabelWriter 450 Turbo (Available at Amazon.com and Staples)
- Label Size: 2 5/16" x 4"
- Purchase at Amazon.com and Staples
- Designed to be printed by a DYMO single-label printer
- Avery Label 5163
- Can be printed on any inkjet or laser printer
- Label Size: 2" x 4"
- Purchase at Amazon.com and Staples
There are three ways to add products to your inventory. You can select which way to add products by clicking the "Add Product" menu on the right side of the screen. From that menu you can select one of three methods:
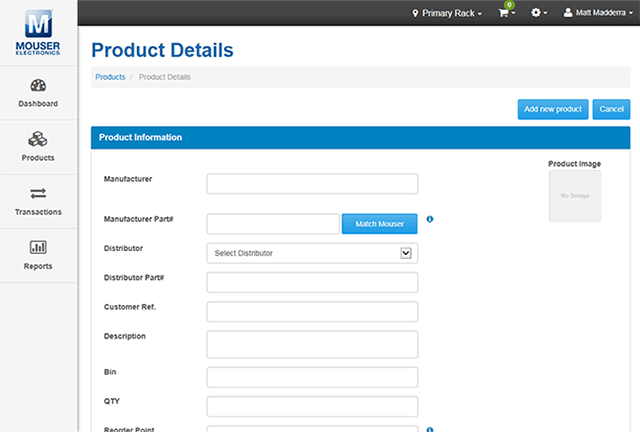
- Add a Product - You will be directed to a blank product detail entry form to fill out.
- Import Products - An overlay will display with the steps to upload a spreadsheet containing multiple parts.

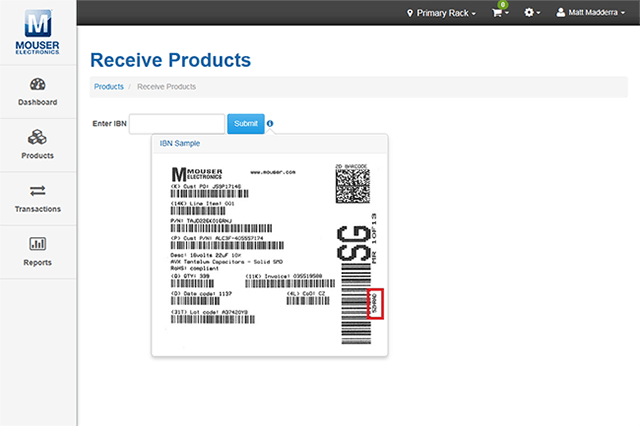
- Barcode from Mouser Label - You will be directed to a special form where you can input a code from a Mouser packaging label to automatically import product data.
The Mouser Match feature lets you link products in your inventory to Mouser part numbers. Doing this has several benefits including:
- Automatic syncing of product data (description, manufacturer, lifecycle, etc.)
- Automatic import of product image from Mouser.com
- Ability to reorder products from Mouser in just a few clicks
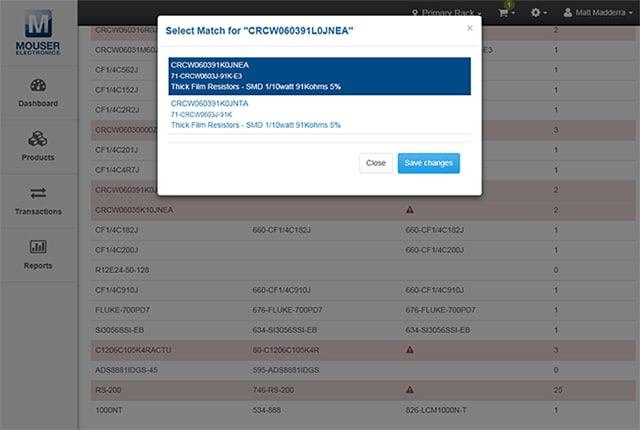
Clicking the Mouser Match option in the "More" menu will direct you to the part matching screen. Once on that screen, you can kick off the match process by clicking the "Run Matching Process" button. As parts are matched, the number of possible matching parts is displayed in the result count column. When an exact match is made, the parts will be automatically linked and those part will be removed from the screen. At the end of the process, the only items remaining will be those parts that could not be automatically matched. These parts require you to take action before a match can be made.

To resolve any parts that cannot be automatically matched, click the "!" icon. When click, you will see an overlay with up to 10 possible matches for your part. Simply review the suggestions, and select the appropriate match. Once you have done this for all parts that you want to resolve, click the green "Save Match" button.
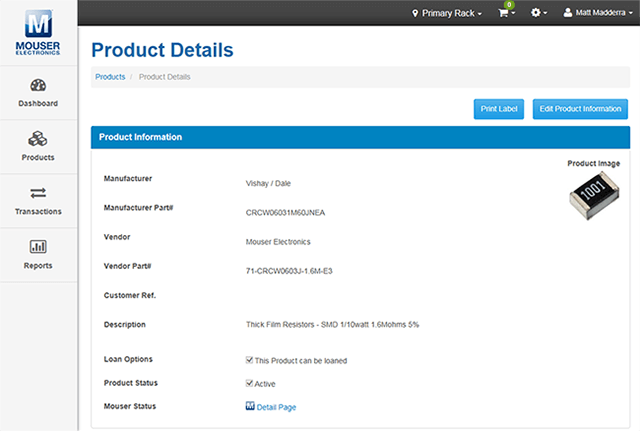
From a product detail page, you can edit all information associated with a product by clicking the "Edit Product Information" button. This action will open all fields for editing. When you have finished making the desired updates, click the "Save" button to apply all the changes, or the "Cancel" button to discard them.
In addition to editing product information from the detail page, you can also make quick edits directly in the products listing. Clicking the Edit icon (pencil) allows you to update the Part #, Manufacturer, Description, and Bin fields. When you have finished, click the tick symbol to save changes or the undo arrow to discard them.
Inventory Transactions
While you can manually decrement your on-hand inventory counts, the Inventory Management system allows you to issue parts to specific entities for tracking purposes. From the products listing screen, select the check box for one or more products and click the "Issue Selected". This will bring up a modal overlay with the selected parts listed. The modal will also contain fields for specifying who the parts are being issued to and if any parts are required to be returned.
Because products must be issued to specific entities, you select the consumer for the transaction in the modal overlay. You can do this by clicking on the "Select Consumer" drop-down list. The list contains all the preloaded consumer names, for your convenience, along with the option to "Add New". If "Add New" is selected, four additional text fields will appear (First Name, Last Name, Email, Phone) on the modal.
When issuing products to a consumer, you may stipulate if a particular product is required to be returned by selecting the "Return Required" check box. When selected, you will be required to assign a return due date. If a product is not expected to be returned, simply leave the "Return Required" check box empty.
To add more products to a transaction before it is submitted, simply click the "Save and Add Products" button. To discard all transaction information, click the "Clear Form" button. To proceed and commit a transaction, click the "Submit" button.

The whole transaction history is accessible from the "Transaction Management" screen. By default any Active transactions are displayed. An "Active" transaction is one that has parts currently out on loan. You can change the view to "Transaction History" to see all other transactions.
To view the details of a particular transaction, click the Transaction ID number. This will display a modal overlay that will contain detailed information about that transaction, including: consumer's name, email, phone, checkout date, notes, and product details.
![]()
To make it easy to locate a particular transaction, you may search all records by Transaction ID number, the Consumer's name, or part number. Just select your search criteria from the drop-down list and enter your search term to display all matching records. You can clear your search results at any time by clicking the "Reset" button.
![]()
In the transaction details modal overlay, you can make several edits. These edits can be as minor as adding transaction notes, or as substantial as updating the issue quantity or return due dates. You can also mark an active transaction as closed by specifying any return quantities, the return date and clicking the "Complete Transaction" button.
![]()
Reporting
In order to make it easy to report on your current and historical inventory levels, the system has a dedicated Reports section. This area offers a variety of helpful reports to help you effectively manage your inventory.
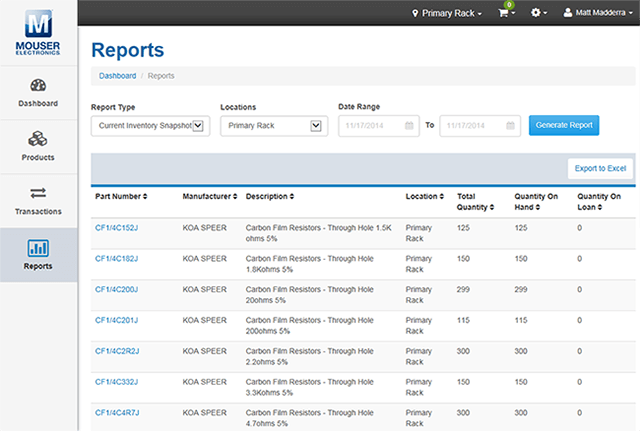
- Current Inventory Snapshot - displays all products from a selected location with current inventory totals.
- Historical Inventory Report - For the selected location and date range, the report will display the net change in inventory and identify key transactional figures.
- Usage By Bin - For each part and bin combination in a selected location, the report will display the total # of adds, disbursements and returns for a date range.
- Usage By Consumer -For a selected location and date range, the report will display all consumers and the parts disbursed/issued to them.
- Overdue Loans - This report will list all consumers that have overdue parts taken from a selected location based on the current date.
- Inventory Reorder - This report display parts from a selected location where the Total Quantity in stock is currently below the specified Reorder Point Quantity.
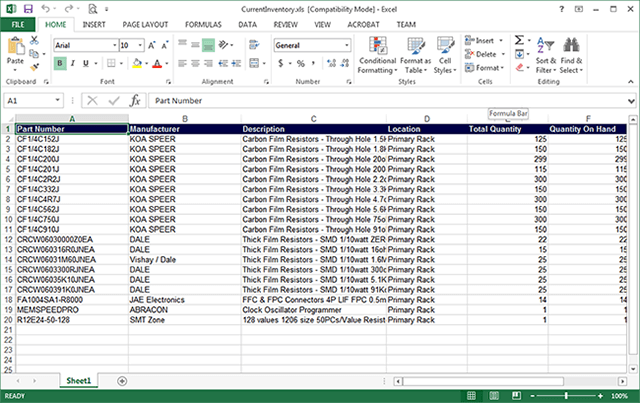
All reports displayed online can be exported for offline viewing and further "slice and dice" manipulation in Microsoft Excel. To save reports, simply click the "Export to Excel" button near the top right of the screen.
Note: To keep data processing times down to a minimum, very large online reports will only partially display. You will have to download the Excel report to view the full details.
Reordering Products
When you click the "Create an Order" button on the dashboard or the "See All Items" link on the basket menu, you will be taken to the reorder products section of the system. All items added to your reorder list will be displayed on this page and grouped by location. Suggested reorder quantities will be pre-filled, but you can alter them as necessary.
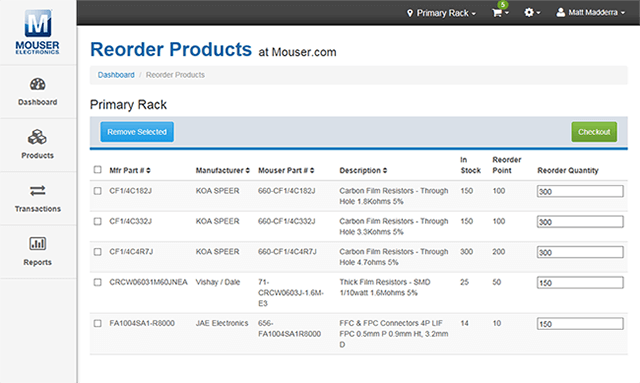
When you are ready to purchase the items in your list, click the green "Checkout" button. This will automatically transfer the parts for the selected location to your shopping basket on Mouser.com, where they will be ready for purchase.
If you want to empty your product reorder list, simply select the appropriate product or products, and then click the "Remove Selected" button.
Administration
For users with appropriate administration access privileges, there are numerous global settings and functions that can be set or altered at any time.
Organisation
- Organisation Information - This page will display with the organisation name and contact information for the inventory account. Clicking the "Edit" button on this screen will cause the data to become editable. You can add/remove/edit the information, then save or discard changes when done.
Locations
- Locations List - When clicking the "Location" link from the configuration/settings drop-down menu, a page with a listing of all Locations and their descriptions will be displayed. Clicking the Edit icon (pencil) next to a location will cause the name and description to become editable. When you have finished making changes, you can click the green tick symbol to accept and save, or the red revert arrow to discard the changes.
- Delete Location - Clicking the Delete icon (garbage can) next to a location will cause a confirmation message to appear. If you are sure you want to proceed with the action, the location will be removed from the system immediately. Please note, this action cannot be undone.
- Add new Location - You can type a new location name and description in the fields provided at the top of the page and select the "Add a New Location" button. When saved, the new location will appear in the listing with all the other locations.
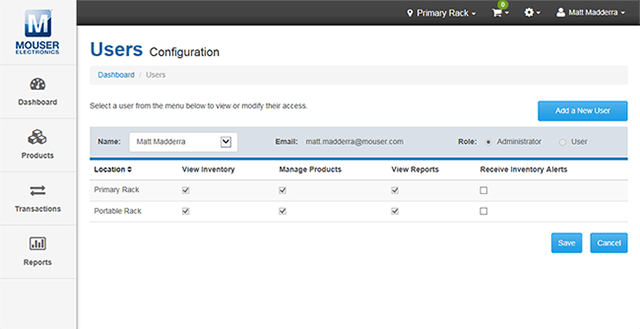
View and Edit a User's permissions - From the Users Configuration screen, you can select a user from the provided drop-down menu. Upon selection, a grid containing that user's details and permissions will be displayed. Administrators can change permissions by either switching the selected user's role (between Administrator or User) or they may granularly select which activities the user will have access to for each location.
Remove a User - Once a user is selected and their permissions grid is loaded, Administrators can delete a user by clicking the "Remove This User" button. A confirmation message will then appear, and if confirmed, the selected User will be removed from the system immediately. Please note, this action cannot be undone.
Add a New User - When you click the "Add a New User" button, an overlay asking for an email address will appear. Once an email address is provided and initial permissions are set, an email will be sent to the requested user. The email will contain a unique registration code and instructions on how to access the inventory system. Once the user completes the necessary steps, they will be granted access. Please note that, for security reasons, registration invitations expire after 24 hours.